Snow foaming is one of the most enjoyable and useful parts of the car washing process. If you’re using a snow foam to pre-wash your car before you touch it with a mitt, then you’ll need to make sure it’s working as effectively as possible. So here are 8 tips to improve the quality of your snow foam.
How to Make Thicker Snow Foam
- Use the correct orifice size in your foam cannon for your pressure washer
- Ensure the system is free from leaks
- Use an appropriate dilution ratio
- Choose a higher foaming snow foam
- Ensure your foam cannon’s settings are on the maximum and the spray pattern is a fan
- Rinse the foam cannon after use
- Service your foam cannon
- Use a higher quality foam cannon
Check out my snow foaming tips video on YouTube.
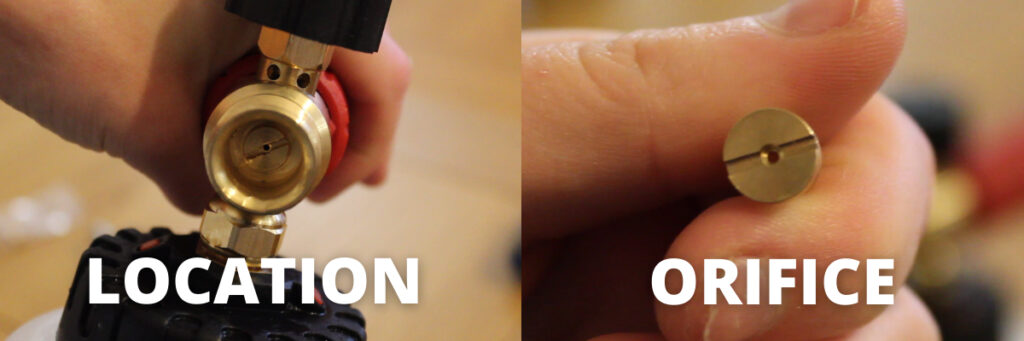
Use the Correct Orifice in Your Snow Foam Cannon
The orifice controls the flow through the nozzle and it sits inside the foam cannon’s casing. The smaller the orifice is, the higher the pressure will be, hence the foam will be thicker.
However, it is vital that you choose the correct orifice for your pressure washer.
Choosing a size that is too small for your pressure washer will mean the flow is restricted and can break the pressure washer or cause it to pulsate. Choosing an orifice which is too large won’t cause any mechanical problems, but it does mean your snow foam will have a thinner consistency.
The most common orifice sizes are 1.1 mm, 1.25 mm and 1.35 mm.
| Orifice Size | Pressure Washer Suitability | Example Pressure Washer |
| 1.10 mm | 90-110 bar | Karcher K2 |
| 1.25 mm | 110-150 bar | Karcher K4 |
| 1.35 mm | 150+ bar | Karcher K7 |
Your snow foam cannon should come with the specifications to tell you what orifice size it has. If you want to change the size of your orifice then it’s fairly easy to do on most foam cannons. You may need to unscrew the section where the foam lance adapter connects to the nozzle to access it.
Ensure Your System is Not Leaking
One of the biggest causes of thin snow foam is due to a leak in the system which results in a drop in pressure. This drop in pressure means that the foam cannon cannot adequately aerate the solution to a desirable consistency.
If you notice a sudden change in the foam thickness compared to the previous use, then it’s likely due to a leak in one of the following areas:
- Tap
- Hose connection to the tap
- Hose connection to the pressure washer
- Hose connection from the pressure washer
- Connection between the foam cannon and pressure washer
- Connection between the foam cannon adapter and the nozzle
If you are struggling to get a tight seal then you can use PTFE tape to make sure that there are no leaks in the foam cannon.
Also, it may sound obvious but make sure that your hose isn’t kinked and that the flow of water coming out of your tap is the same as what’s going into your pressure washer.
I recently noticed a drop in the foam thickness as there was a kink in the hose reel which I hadn’t noticed but it was easy to identify by disconnecting each point and checking the flow rate. Once I’d realised the flow was weaker from the end of the hose compared to directly from the tap, it was a very quick fix!
Use an Appropriate Dilution Ratio
Every snow foam will have a recommended dilution ratio and it will usually be a range e.g. 1:10 to 1:20. The recommended dilution ratio varies greatly between snow foams, so don’t assume you can use the same amount for every snow foam you own, if you happen to use multiple types.
Remember that using a higher dilution ratio will not only affect the thickness, but also the cleaning power. If you are using an alkaline snow foam and choosing the highest dilution ratio when it may not always be necessary, then this will start to have a negative effective on any waxes or sealants over time.
The way that the product states it’s recommended dilution ratios can also vary, making it sometimes more confusing to calculate how much product you need to add.
Method #1 Dilution Ratio
Most snow foams state the dilution ratio clearly e.g. 1:10. In this case, you would add 100 mL of product to 1000 mL of water in your foam cannon. Some also state the amount you’ll need in mL or oz. to make things very straight forward to work out how much product you need to use.
Method #2 Panel Impact Ratio
This is a more accurate way of calculating how much snow foam you need to add to your cannon to be able to get the best from the product. Bilt Hamber Auto Foam and Touch-Less both use this method.
The panel impact ratio (PIR) of a snow foam refers to the concentration of the product when it hits the car, as opposed to what you add to your foam cannon. This is more accurate because different pressure washer and foam cannon combinations will dilute the solution in the foam cannon differently. Using PIR forces you to work backwards with the calculation to keep it consistent.
The PIR will be given as a percentage, which is usually between 1-4%. Here’s how to calculate it.
- Fill your snow foam cannon with water.
- Dispense the cannon filled with water into a bucket.
- Measure how much water was dispensed.
- Calculate the desired PIR by calculating the percentage of how much water was dispensed in step 3.
Example: If the snow foam cannon is filled to 1 L, and you connect it to your pressure washer and dispense it fully and this results in 10 L of water in the bucket, then the pressure washer is diluting it by 10x. If the snow foam has a recommended PIR of 4%, then you would calculate 4% of 10 L which is 400 mL (0.4 L). This means you need to add 400 mL of snow foam to your cannon, and then top it up with water by adding 600 mL to achieve the correct panel impact ratio.
I also have a very quick video on my YouTube channel to help explain the calculation.
Method #3
Some snow foams such as Autobrite Magifoam will not give a dilution ratio or PIR, but instead will say something like “add 1-2 inches of snow foam to your foam cannon and top up with water”.
This isn’t massively helpful as different foam cannons have different widths, meaning the dilution will be completely different depending on the shape of your foam cannon.
However, from experience, it’s usually safe to assume that 1 inch roughly equates to 75 mL of product. So in this case, you would add 75 mL of snow foam and 925 mL of water to your foam cannon for the 1″ measurement, or 150 mL of snow foam and 850 mL of water for the 2″ measurement.
Choose a Higher Foaming Snow Foam
Some snow foams have more foaming ability than others, so if you want a thicker foam, then you’ll need to choose something that fits the bill.
Snow foams like Bilt Hamber Auto Foam and Touch-Less will never be “thick” even if you doubled the recommended dilution ratio, simply due to the composition. However, some foams such as Autobrite Magifoam are still incredibly thick even if you use the lowest recommended dilution.
In general, a thicker snow foam will sit on the panel for longer and hence have more time to clean. However, this is not always the case.
Some very thick foams can also be quite dry, meaning that they slip of the panel quite quickly. Using a higher ratio of a snow foam like this can actually mean that it has less dwell time because the weight of the foam causes it to drag itself down the panel more quickly.
Looking for some of the best detailing products? Make sure you check out my recommended products page for all my current top picks.
Use the Correct Foam Cannon Settings
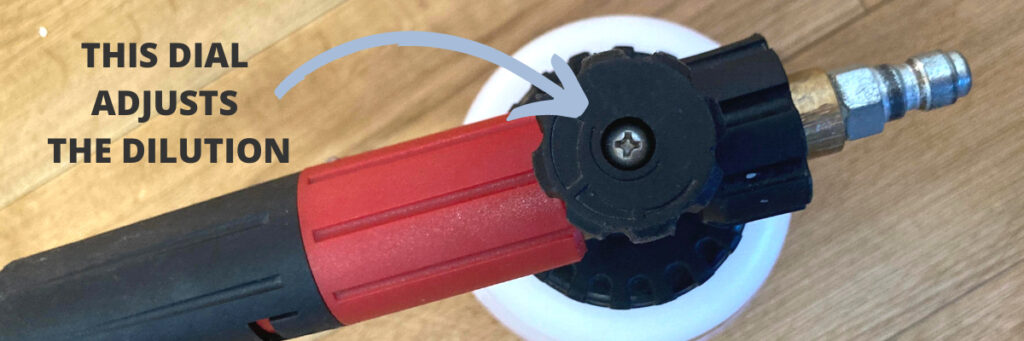
Most snow foam cannons have two basic controls:
- A dial on the top to control how much the solution in the foam cannon is diluted.
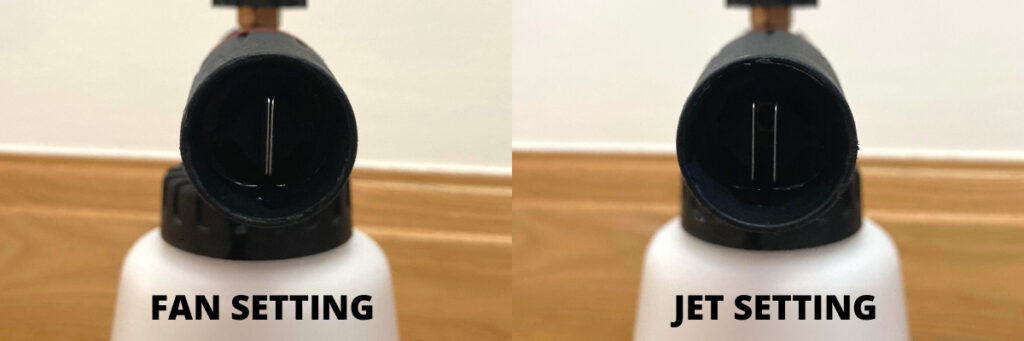
- An adjustable nozzle so you can change the spray pattern.
In most cases, it’s a good idea to turn the dial on the top up to maximum to ensure the foam is as thick as possible and that the dilution hitting the panel is appropriate. However, it may be useful to turn it down slightly when using a very thick snow foam if you notice that there are lots of air bubbles in the foam.
Some like to fill their snow foam cannon with a neat solution of the snow foam and use this dial to achieve the correct dilution. I do not do this personally as it makes it difficult to achieve an accurate dilution of the product and is more likely to clog up the foam cannon’s filter.
With regards to the nozzle, I like to adjust this so that the spray pattern is a fan rather than a jet, as this allows me to more efficiently coat the car. Using a jet pattern means you’ll need to move your foam cannon more to cover the same size area which often ends up using more snow foam in order to achieve an even coverage since it’s not as efficient.
Rinse the Foam Cannon After Use
Foam cannons can become clogged with product if it is left to sit and dry up inside the internal components.
To ensure this does not happen, rinse the reservoir with clean water and then fill it up with clean water, attach it to your pressure washer and then rinse it through for around 20 seconds after each use. This will flush all the residual snow foam out of the internal components of the foam cannon.
If you still have foam that you want to use for the next wash inside the reservoir, then you can still do this. Simply pour the solution into a measuring jug or cup and then perform the steps as above.
Once your done then you can simply pour the solution back into the reservoir. It’s a good idea to disconnect the pickup pipe though so it is not sat in the solution for a prolonged period of time to ensure it does not get clogged up.
Service the Foam Cannon
If you notice that the quality of the foam has declined since you purchased the foam cannon, then it may need to be serviced to make sure that it is fully functional. Here’s how to do it:
- Push the pin that connects the nozzle in and then slide off the nozzle.
- Remove the gauze.
- Remove the orifice using a flat headed screw driver.
- Remove the adapter which connects the foam cannon to the pressure washer trigger.
- Check that you can see all the way through the cannon at this point. If you cannot, then this will also need cleaning.
- Remove the pickup pipe and check for blockages.
- Place the metal components that you removed into caustic soda solution and leave for 24 hours.
- Reassemble the foam cannon.
Check out this guide to dismantling and cleaning a foam cannon for the step-by-step process with images.
Use a Higher Quality Foam Cannon
If you are using a very cheap foam cannon and have tried all the steps above and are still struggling to get good quality foam, then it may be time to upgrade.
I use an MJJC Foam Cannon Pro V2 which comes with the following features:
- Weighted pickup pipe so solution can be collected even when the cannon is tilted.
- Spare filters, gauze and orifice.
- Vertical and horizonal spray pattern adjustment.
It’s very sturdy and is well-known for being one of the best foam cannons on the market for producing thick foam.
I also have a YouTube video showing it in action.
Does Warm Water Make a Difference?
Many car owners like to use warm water to help make the foam thicker, however this does not have much of an impact on the thickness from my experience.
The solution in your foam cannon will be diluted by the pressure washer usually by around 10-15 times, meaning that the solution will be cold by the time it comes out of the foam cannon. Hence, it makes little difference to the foam’s consistency.
Using filtered water is more likely to make a difference, but again the water going through the pressure washer would also need to be filtered to make a real difference so again it’s not very practical or useful.
Is Thicker Snow Foam Better?
Many car cleaning enthusiasts look to increase the thickness of the snow foam they are using, but often this isn’t really necessary. Although thicker foam looks cool, it’s not always functional.
As I mentioned earlier, if the foam is very thick but also quite dry, it tends to slip off the panel more quickly. Equally, there are some foams with quite a thin consistency that will stick to the paint for longer. This is not always the case though. For example, Autobrite Magifoam is very thick but does dwell for a long time.
What I’m trying to say here, is that foam thickness and dwell time are not always related, and it’s really the dwell time that you want to be able to get the panels as clean as possible before the contact wash.
In reality, the thickness of the foam doesn’t matter all that much because only a very thin layer is needed to coat a car in foam, and anything on top of that isn’t in contact with the paint, so isn’t doing anything to clean the car.
It’s best to prioritise cleaning ability in my opinion, over foam thickness.
If you’re looking for some options, check out my comparison of 5 different snow foams which all have strong cleaning capability.
Check out my snow foaming tips video on YouTube.
Here are some more articles you might find useful:
