Applying a ceramic coating can be a daunting process as there are a lot of steps involved in the preparation. One of the biggest questions being asked is whether or not the paint needs polishing before the coating is applied. In this article, I’ll address this question and explain why polishing the car first is advised.
The Two Reasons to Polish Before Coating
A car’s paintwork should be polished before applying a ceramic coating. Polishing the paint ensures that it is completely clean to give the ceramic coating the best surface to bond to to achieve its full durability. Polishing also removes any light defects before the coating is applied.
There are two reasons why polishing before coating is recommended:
- To remove scratches and swirl marks
- To ensure the coating can bond properly
Let’s take a look at each reason separately and explain why the polishing process is so important.
It’s worth noting one crucial thing before we get into the article. Polishes and waxes are not the same thing. Polishes are abrasive and remove a layer of paint. Waxes are designed to provide a layer of protection. It is important to polish a car before applying a coating, but it is a terrible ideal to wax a car before coating it. Check out this article to learn why waxes and coatings don’t mix.
#1 To Remove Scratches and Swirl Marks
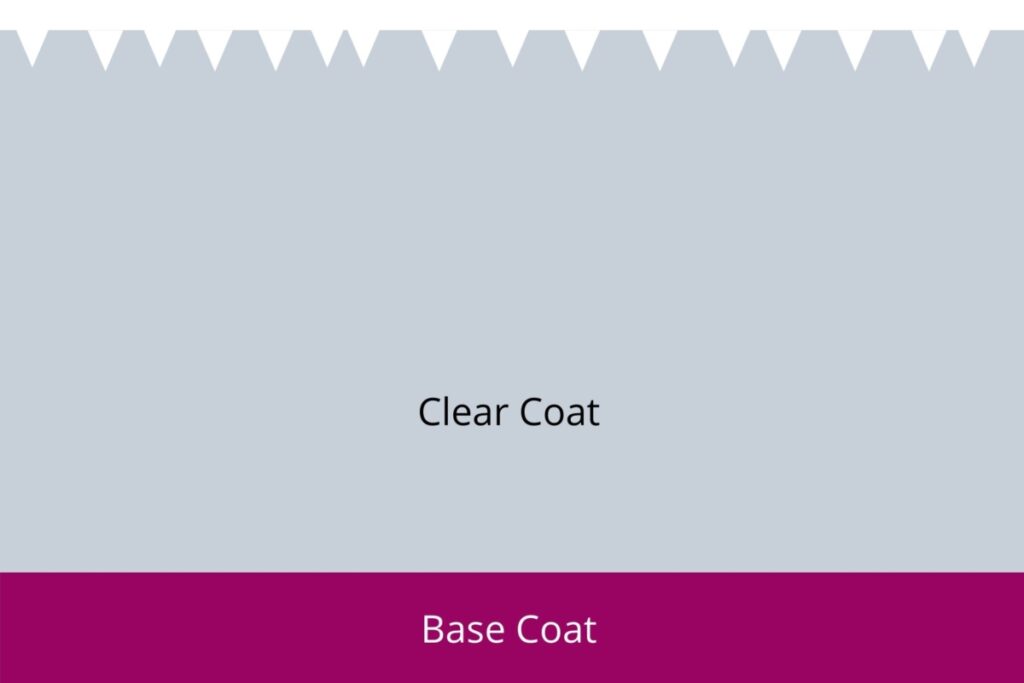
Scratches and swirl marks exist in the clear coat (top layer of paint which provides the gloss) of pretty much every car on the road. Even brand new cars will have some minor clear coat imperfections which have been instilled at the factory.
These clear coat scratches are caused by improper washing and wiping of the paintwork. The clear coat is very delicate and easily scratched and marred. These scratches are easily noticed in direct sunlight, but also cause the paintwork to look duller in all lighting conditions.
If you want to learn more about the proper wash technique to avoid scratches and swirls then check out my complete guide to safe-washing to learn more.
These scratches can also be caused by claying the car. Claying is an essential step before applying a ceramic coating because it removes bonded contaminants which would otherwise prevent the coating from properly bonding to the paintwork.
The damage inflicted during the claying process can be reduced by using a softer clay, folding the clay more frequently to keep it fresh, and using a good clay bar lubricant. However, no matter how careful you are, claying is incredibly likely to inflict some minor swirls or marring.
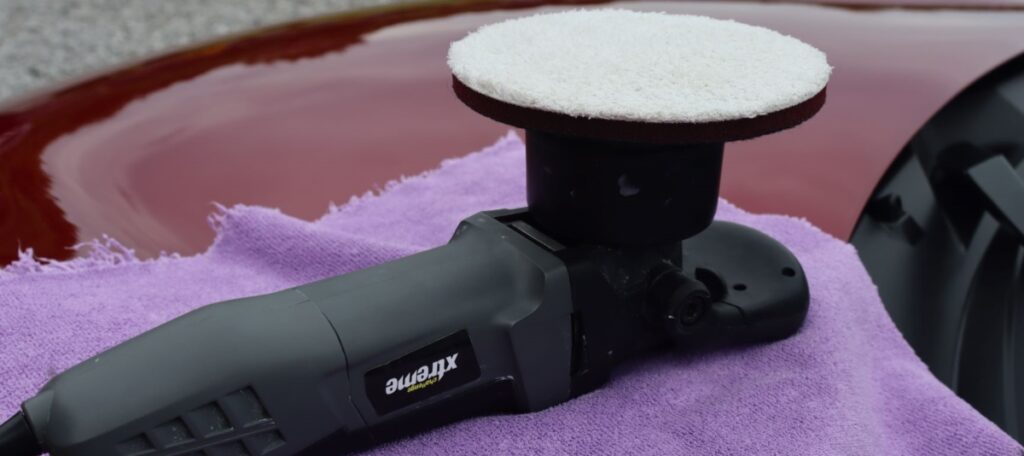
Polishing the paint removes clear coat damage by abrading away the top layer of the paint to reveal a fresh, flat layer. Machine polishing is the best way to do this, as it yields far better results and is more efficient compared to hand polishing.
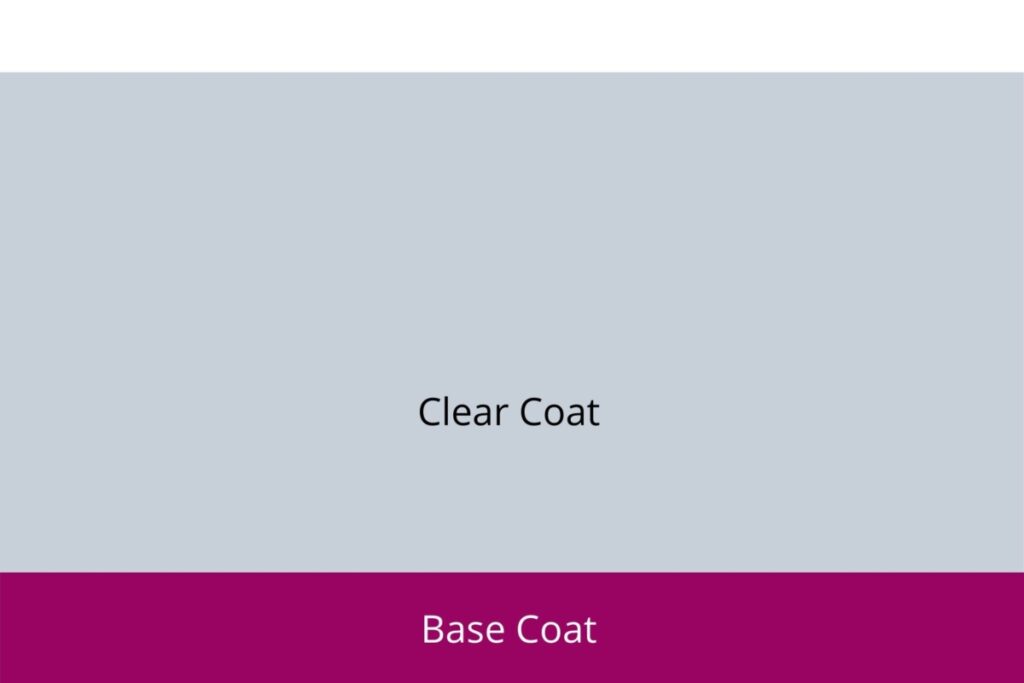
If the paint is not polished and the damaged clear coat is not removed before applying the ceramic coating, then it is essentially “locked in”. It is not possible to polish these imperfections out after applying the coating, because this will remove the coating in the process.
Hence, the defects must be dealt with before applying the coating, via the machine polishing stage. Otherwise, you’ll have to deal with having scratches and swirl marks in the clear coat until the lifespan of the coating ends (which is several years in most cases), or remove it prematurely.
#2 To Ensure the Coating Can Bond Properly
The second reason why a car should be polished before using ceramic coating, is to ensure it bonds properly and the maximum durability can be achieved.
A ceramic coating should only be applied to completely clean paintwork. This means it must be prepared by first washing thoroughly, decontaminating (using tar remover, iron fallout remover and clay) and polished.
After the decontamination step, the paintwork should be pretty clean. However, the polishing stage helps to ensure the paint is free from any previous forms of paint protection e.g. waxes and sealants which can be difficult to remove via claying alone.
Also, as I mentioned earlier, the claying process is likely to cause some marring and swirls in the clear coat and the only way to remove this is by polishing. Hence, polishing can be viewed as either a direct or indirect stage in the process of ensuring the paint is completely clean.
If the paint isn’t free from contaminants and old waxes/ sealants/ coatings, then the coating will not be able to bond to the paint properly. This means it won’t last nearly as long as it should and you may notice poor performance from the offset.
Ceramic coatings are expensive, so it really does pay to put the effort into the prep process to get the most out of them.
What About Brand New Cars?
Okay, so what about brand new cars that have just rolled into the showroom?
Whilst brand new cars will be cleaner and have fewer swirls compared to older vehicles, unfortunately, they’re not exempt from machine polishing if you are applying a coating.
New cars travel long distances before they reach their first owners. During these journeys, the cars will collect contamination which needs to be removed via the chemical and physical decontamination process.
As mentioned earlier, claying the car (physical decontamination), will inflict some minor swirls and marring that needs to be removed via polishing before applying a coating.
Also, even most brand new cars will have some minor swirls or scratches that will need to be removed before coating if you’re looking for that perfect finish. Polishing the paint will help to improve the gloss levels even on most brand new vehicles.
Ceramic Coating Prep and Application Steps
No matter the age of the car, it’s best to follow the full preparation routine to ensure the ceramic coating lasts as long as possible. Here are the steps involved:
- Pre-wash the car to remove as much dirt as possible before contact washing.
- Contact-wash the car thoroughly.
- Chemically decontaminate the paintwork using a tar remover and iron fallout remover.
- Clay the car to remove any remaining bound contaminants.
- Wash the car again to remove any loose contaminants lifted after claying.
- Dry the car.
- Polish the paintwork.
- Use a panel wipe solution to remove any oils left behind after polishing.
- Apply the ceramic coating.
I’ve not mentioned step #8 so far in this article, but it’s actually one of the most important preparation stages.
Polishes contain oils which are not removed when the residue is removed from the panel using just a microfiber cloth. Instead, these oils must be removed by spraying the panel/ cloth with a panel wipe solution and wiping until the product flashes away.
If these oils are not removed before coating the car, then the ceramic coating will not bond to the paintwork. It’s such an easy step to perform, so don’t fall at the last hurdle!
I recommend going over the paint with the panel wipe solution after polishing each section, then after the car has been polished, going over the car once more with a fresh cloth and the panel wipe solution to ensure the paintwork is super clean.
Check out my complete guide to preparing for and applying a ceramic coating to learn more about the process.
