Ceramic coating your wheels is the best way to protect them from the elements. Whilst ceramic coatings help to keep the wheels cleaner, they do still need washing regularly to maintain their performance.
In this article I’ll take you through a step-by-step guide to cleaning ceramic coated wheels and outline the products you’ll need.
Quick Guide to Cleaning Ceramic Coated Wheels
- Pre-wash the wheels using either an all-purpose cleaner (APC) or citrus pre-wash spray
- Rinse the wheels using a pressure washer
- Apply a mild wheel cleaner or shampoo to the wheels
- Agitate the wheel faces and barrels using a microfiber or wool mitt and barrel brush
- Periodically rinse out the brush and mitt in a bucket of clean water
- Rinse the wheels
- Dry using either a microfiber towel or car dryer
What You’ll Need
- Large bucket of water (15-20 L)
- Pressure washer
- All-purpose cleaner (APC) or citrus pre-wash
- Mild wheel cleaner or wheel shampoo
- Microfiber or wool wheel mitt
- Microfiber or wool wheel barrel brush
- Microfiber towel or car dryer
This page contains product affiliate links. We may receive a commission if you make a purchase after clicking on one of these links.
Step 1: Pre-Wash the Wheels
Pre-washing the wheels in the same way that you’d pre-wash the paintwork is always a good idea.
The wheels quickly become contaminated with brake dust and dirt which is abrasive and can scratch the ceramic coating if it is wiped over it. The best way to reduce the risk of this is by trying to remove as much of it as possible before making any contact with the wheel.
Since ceramic coatings have good water and dirt repellency, you may find that a thorough rinse with a pressure washer is enough to remove the bulk of these contaminants.
However, for best results it’s a good idea to use a pre-wash chemical.
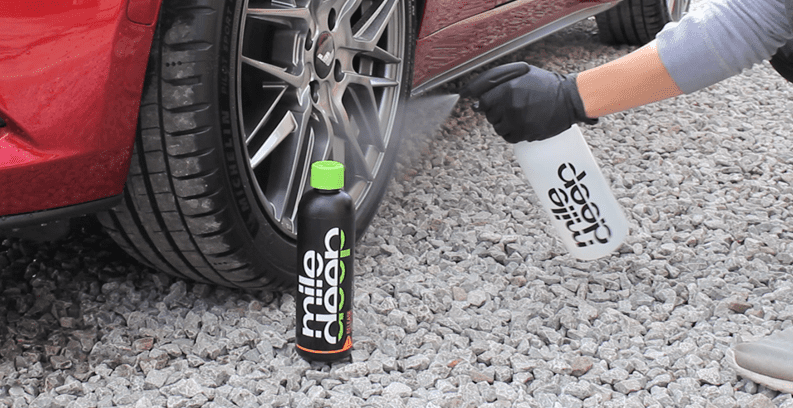
Most of the time I use a citrus pre-wash or all-purpose cleaner to do this. Here are links to two of my favourites :
- Koch Chemie Greenstar (USA Amazon Link or UK Link) – diluted to 5% concentration (1 in 20)
- Mile Deep Release – diluted to 20% (1 in 5)
Don’t use an aggressive wheel cleaner or concentrated citrus/ APC for this pre-wash. You don’t need to use harsh chemicals for this stage to be effective and it risks degrading the coating over time if you go in too aggressively.
Here’s how to pre-wash the wheels:
- Apply the pre-wash chemical liberally to the barrel and face of the wheel using either a spray bottle or pump sprayer. Apply to dry wheels for best results.
- Allow the chemical to dwell for the recommended period of time (usually 2-5 minutes) but do not allow it to dry onto the wheel.
- Rinse the chemical with a pressure washer but be careful not to hold it closer than 1 meter away.
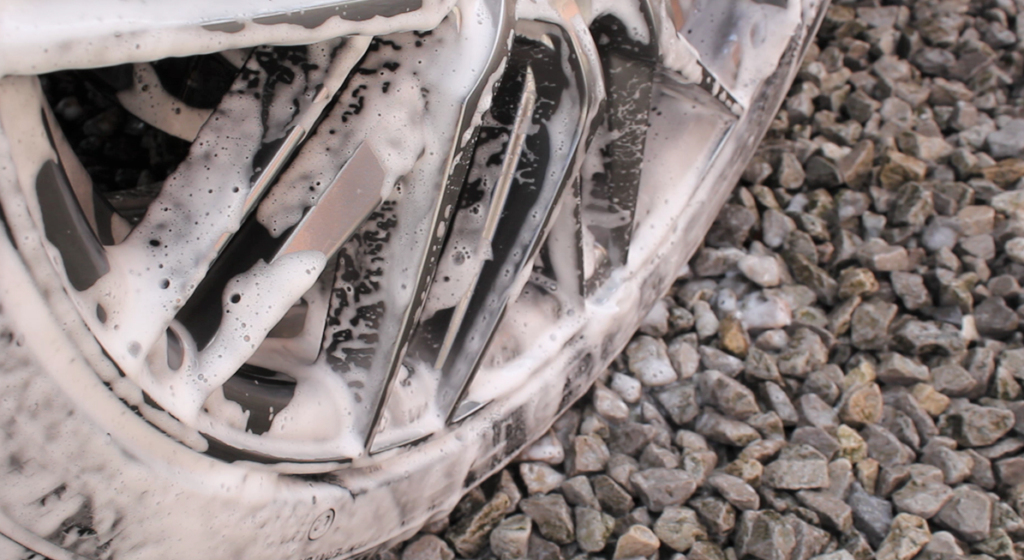
Step 2: Apply a Mild Wheel Cleaner or Shampoo
Now that most of the brake dust and grime has been effectively removed from the wheel, it’s time to clean them properly.
I recommend using a mild pH neutral wheel cleaner or wheel shampoo to do this. A mildly alkaline diluted wheel cleaner should be fine but you should not be too aggressive.
Do not use acidic wheel cleaners on ceramic coated wheels. This can permanently damage the coating or degrade it.
Now you have the choice of either a sprayable wheel cleaner, or a wheel shampoo. Regular car shampoos will also work but are not formulated to clean the wheels as thoroughly so I’d advise going with a dedicated wheel shampoo.
Do not use any household cleaners or detergents to clean any part of the car.
Personally, I prefer to use a wheel shampoo instead of a sprayable wheel cleaner because they offer more lubrication which means the finish is less likely to get scratched, swirled or marred during the process.
My favourite wheel shampoo is by Garage Therapy and it can be used in a couple of ways:
- The wheel shampoo can be added to a bucket of clean water at a dilution of 20 mL to 20 L of water.
- It can be applied using a foaming pump sprayer at a dilution of 10 mL to 500 mL of water. Here is a link to the IK Foamer I use on Amazon.
My preferred method is to use the IK Foamer as this results in the best level of lubrication and economical use of the chemical.
Here is a link to the Garage Therapy /ONE: Wheel Shampoo.
If you want to see this process in action. Check out the YouTube video on the Auto Care HQ channel below.
Step 3: Agitate the Cleaning Solution
Once the wheel cleaner has been applied you can then agitate it.
Use a soft, clean high-quality microfiber or lambs wool mitt to clean the faces of the wheel. Avoid using brushes as these can potentially scratch the coating.
I have two favourite mitts which I switch between to do this, here are links to them:
On the barrel of the wheel I’d advise using either a microfiber or wool brush. My personal favourite is the Mammoth Woolly Wheel Wand (Amazon link) as it is super soft and also compacts to fit into small gaps between the callipers and barrel.
Other popular options are (Amazon links):
You’ll also need a bucket of clean water to rinse out your wheel mitt and brush regularly to prevent dirt from building up and being rubbed into the finish. Alternatively, you can pressure wash your mitt and brush to remove the dirt.
There is a bit of a debate in the industry as to whether the faces or the barrels should be clean first.
I personally prefer to clean the face first, as when the barrel is cleaned it drags dirt back onto the face of the wheel which I don’t want to rub into the finish. Cleaning the barrel second helps to keep the face cleaner when the mitt is being used on it.
The other school of thought is that the barrel is dirtiest so should be cleaned first and otherwise the face will get dirty again. Whilst it’s true that the dirt from the barrel will be transferred to the face, I’ve never experienced this to be an issue as it is simply rinsed away at the end.
Step 4: Rinse
Once the wheels have been thoroughly cleaned it’s time to give them a rinse to remove all the chemical and loose dirt. I always do this using a pressure washer which makes the process as efficient and effective as possible.
Again, don’t hold the nozzle too close (around 1 meter away is fine) and be as thorough as possible. Often the chemical like to hide in the lug nuts and in the barrel of the wheel so make sure you take your time as you don’t want any chemicals to remain on the wheel and dry out.
Step 5: Dry the Wheel
Once you’ve cleaned the rest of the car you can then dry off the wheel.
There are two options here:
- Use a microfiber towel
- Use a car dryer
I personally like to use a car dryer as the spoke design on my wheels is quite complicated, so using a dryer ensures I can push the water out of all the intricate areas so the wheels are completely dry. This reduces the risk of water spotting.
Another major benefit of using a car dryer is that it’s a completely contactless method, hence there is no risk of causing any scratches or swirls in the coating during this stage.
Here is a link to the BLO Air-RS which is the car dryer I use.
Alternatively, you can use a microfiber towel which is the cheapest option. Always opt for a soft, and completely clean towel and try to dab the water away rather than swipe at it. Use a separate microfiber towel to dry the wheels and paintwork.
Topping Up the Protection
If you follow the 5 steps above then your ceramic coating should last for a long time (providing it was applied correctly).
However, you can go the extra mile every now and again and top up the protection. This will help to enhance the coating so it can last as long as possible.
It’s not always essential but it is a good idea to keep with the same brand when topping up a ceramic coating. You can usually do this with their quick detailer or spray and rinse sealant however it’s always best to check with the brand as to which products they’d recommend using.
How to Decontaminate Ceramic Coated Wheels
Ceramic coatings will help to reduce the amount of contamination build-up on the wheels, but they cannot completely prevent it.
Cleaning the wheels regularly will help to reduce the amount of contamination build-up, however due to their location, it’s highly likely that iron fallout and tar will stick to the coating.
Luckily, the wheels can be chemically decontaminated using iron fallout remover and tar remover.
Tar remover can be used as and when necessary, and iron fallout remover can be used every 3-6 months depending on frequently the car is driven.
Chemically decontaminating the wheels will help to unclog the coating and maintain its performance.
Never use a clay bar (or clay mitt, cloth etc.) on a ceramic coated wheel. Clay bars will abrade the coating and cause scratches, and can in some cases partially remove the coating. You should also never polish coated wheels for the same reasons.
Links to Products Mentioned in this Article
- Koch Chemie Greenstar (USA Amazon Link or UK Link)
- Mile Deep Release
- Garage Therapy /ONE: Wheel Shampoo
- IK Foamer (Amazon link)
- Garage Therapy Wheel Mitt
- Autobrite Woolly Wheel Mitt
- Mammoth Woolly Wheel Wand (Amazon link)
- BLO Air-RS
Ceramic coated your car’s paintwork too? Check out my complete guide to washing and maintaining a ceramic coated car for everything you need to know.
