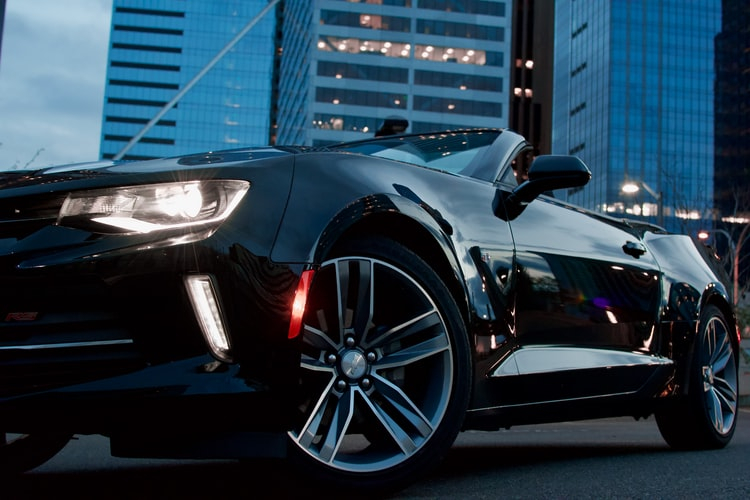
Everyone knows that black cars can be hard to wash and detail because they show dirt, scratches and imperfections so easily, but they look amazing when you get it right.
In this article, I’ll be going through a complete step-by-step guide to detailing a black vehicle to get that glossy wet-looking shine that everyone’s after. So let’s get started.
The Quick Answer
Detailing a black car starts with cleaning the wheels, pre-washing (snow foam) and then washing using a microfiber wash mitt and car shampoo. This is followed by decontamination and enhancement and by either compounding followed by polishing or using a glaze. Paint protection should then be applied.
All the steps in this process are really important if you want your black vehicle to look as good as possible. In this article, I’ll go through each step in simple terms to help you get started today.
Black Car Detailing Tips
If you’re just after some quick tips, then here are the most important things to keep in mind when detailing a black car.
- Pre-wash the paintwork using a snow foam to remove as much dirt as possible before touching the paint.
- Use a car shampoo, not dish soap to wash the car.
- Use a microfiber or lamb’s wool mitt, instead of a sponge or brush when washing the paint.
- Use separate tools and buckets for the paint and wheels.
- Dry the car quickly after washing using a microfiber towel or pressurised air to prevent water spots.
- Never use chamois leather, bath towels or water blades to dry the car.
- Remove swirl marks using a compound followed by a polish, or cover them with a glaze.
- Apply a wax, sealant or coating to protect the paint.
- Don’t let any wax, sealants or coatings touch the rubber trim or it can cause stains.
- Do not remove dust with a quick detailer spray between washes or you will scratch the paint. Instead, wash it when you get time.
- Only clay the car when it feels rough, not as part of a routine.
Now we’ve been through the quick tips, let’s move onto the complete guide.
Washing a Black Car
If you know the first thing about detailing, you’ll know that proper wash technique is vital in order to prevent scratches, but it’s even more important with a black car.
Black vehicles show scratches and swirl marks very easily, particularly on a sunny day.
Not only do these blemishes look ugly in the sun, but they also cause the car to look dull in all kinds of lighting. So if you want glossy paint, it’s vital that you prevent them.
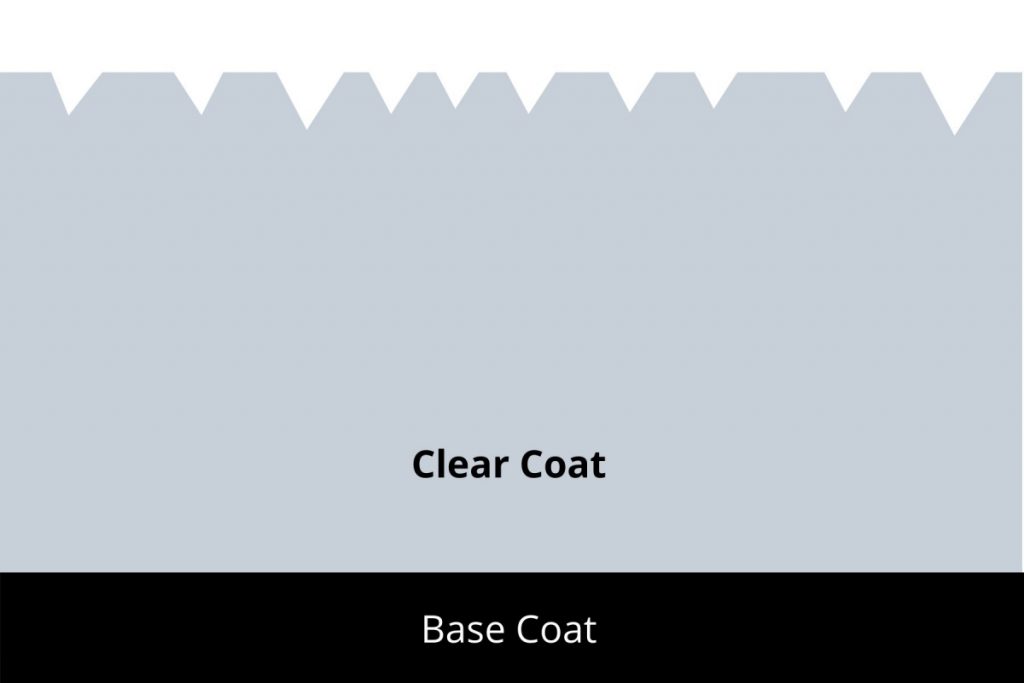
This is because scratches and swirl marks cause the clear coat on the paint (the top layer) to become uneven in texture. This stops light reflecting evenly, and prevents the shiny appearance. Often, the scratches look like spider webs or swirls.
The most common cause of swirl marks and scratches in black paint, is improper wash and drying technique.
What a lot of people don’t know, is that the top layer of paint (clear coat), is actually very delicate. This means that any type of friction is likely to cause marring or scratches.
This friction occurs from two main sources:
- Dirt, dust and debris
- The cleaning tools used to wash the car
In order to protect the paintwork and prevent scratches, friction from both sources must be reduced. So how do you do this?
What You’ll Need to Wash a Black Car
- Pressure washer
- Snow foam and cannon
- Car shampoo
- Two buckets
- Microfiber wash mitts
- Microfiber towels
Here are several rules to keep in mind:
- Do not use a sponge or brush to wash the car, instead use a lamb’s wool mitt, or microfiber mitt.
- Snow foam the car before touching the paint with your mitt to remove as much dirt as possible before making contact.
- Clean the car from top to bottom, because the bottom areas are often the dirtiest so you don’t want to transfer the dirt back up to the clean areas.
- Use separate tools and buckets for the paint and wheels to avoid cross-contamination.
- Check the mitt frequently to see if dirt has accumulated, if it has, then rinse the mitt using high-pressure water.
- Never use chamois leather, water blades (squeegees) or bath towels to dry the paint. Instead use pressurised air or a microfiber towel.
- Never drop any microfiber towels on the floor as they quickly pick up dirt and dust which can easily cause scratches.
If you’re interested in learning more about washing a black car safely, then check out this article I’ve written on the 11 best tips to wash a black car to learn everything you need to know.
Dealing With Water Spots
As well as scratches and swirl marks, black cars are very prone to water spots. They’re such a problem on black paint for two reasons. 1. They’re more visible on dark paint. 2. Black paint typically gets hotter than lighter colours so water evaporates more easily.
Not only do water spots look ugly, but they also can actually corrode the paint, so they need to be avoided. Drying the car immediately after washing it is super important to prevent water spots, but there are plenty of other things you can do too. Here are two articles to read if you’re having issues.
Decontamination
The second step to making a black car shine, is to decontaminate the paintwork. If you’re not familiar with this term, it may seem a little strange. So let me explain it a bit more.
When you wash your car, you’re removing all the visible dirt and dust on the finish. However, there are lots of “contaminants” that cannot be removed by the wash process, because they bond too strongly to the paintwork, glass, wheels etc.
They include:
- Road tar
- Iron fallout particles
- Tree sap
- Hard water spots
- Overspray
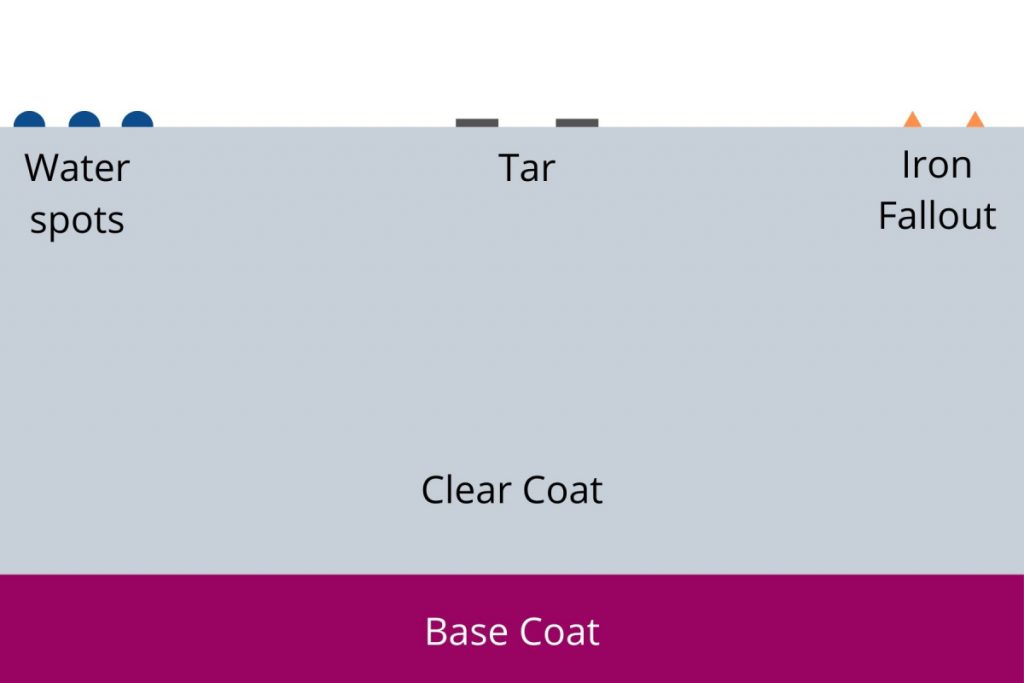
These contaminants cannot be removed by routine washing, so instead sit on the paint causing it too feel rough and look dull.
You can check for these contaminants by running your hand over the paint when it’s been freshly washed and dried. If it feels rough, then the car needs decontamination.
So how do you remove them?
There are two steps to decontamination: chemical and physical.
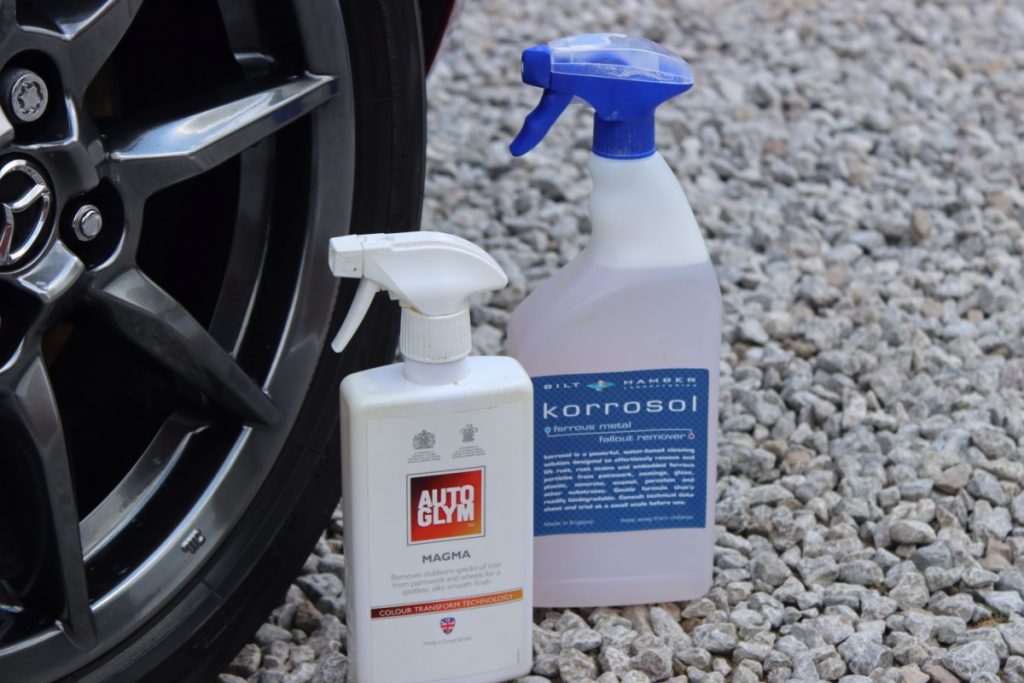
Chemical Decontamination
This aims to tackle the road tar, and iron fallout (which can come from industrial plants, railways or brake dust). You’ll need two products to do this: an iron fallout remover spray and tar remover spray.
Both products are usually applied in a similar way, by spraying onto wet paint, leaving to sit for the specified time (usually 5 minutes) and rinsed away.
Check out my article on iron contamination to learn more.
Physical Decontamination
This aims to tackle the remaining contaminants to leave the paint feeling smooth. Physical decontamination is performed using clay, in the form of a bar, mitt or cloth.
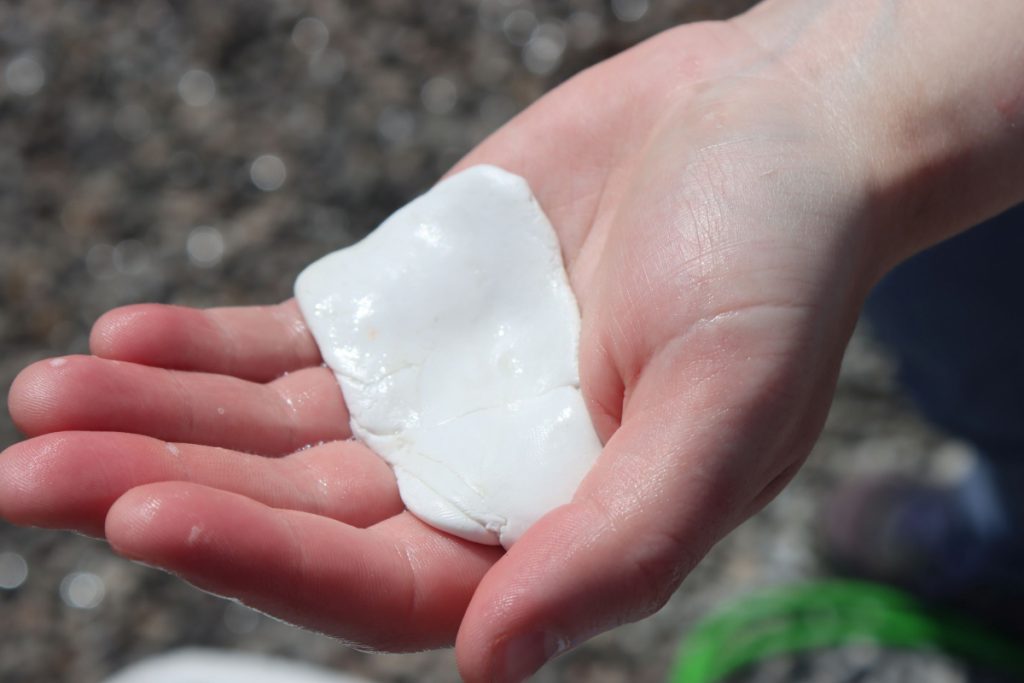
Clay bars can be either natural or synthetic, but the vast majority of clay on the market these days is synthetic. You simply glide it over lubricated paintwork (water and car shampoo, or a clay lubricant spray) to remove bound contaminants.
This process will usually take around 30 minutes on a well-maintained car, but can take a few hours on a neglected vehicle.
Caution should be taken when using clay because it is an abrasive substance. So, it has the potential to cause scratches and swirl marks if used incorrectly.
Make sure you check out my complete guide to claying to learn some essential tips to make the process safer and more effective.
Paint Correction
A lot of car owners make the mistake of thinking that applying a wax or coating will make the car look shiny. However, in reality, this doesn’t make a whole lot of difference.
These products are instead designed to protect the paintwork. If you want glossier paint, then you’ll need to correct the paint instead. This means removing any scratches or swirl marks in the clear coat.
Like I mentioned earlier, a lot of cars have scratches due to improper wash technique. You’ll know if your car has them by looking at the paint in bright light, either on a sunny day or with a flashlight in a dark garage or at night.
In order to get shinier paint, the surface needs to be free from scratches so it is completely flat, allowing light to reflect off it evenly. This process is known as paint correction.
This involves levelling the clear coat by removing a layer of paint. There are two processes involved in paint correction: compounding and polishing. Both can either be performed by hand, or by machine.


Of course there are risks involved with paint correction, and we will talk about these a bit more later on. However, the risks are lower with hand polishing and compounding, compared to using a machine. Although the results will be much better using a machine.
Compounding
This is the more aggressive of the two paint correction techniques. Compounds contain larger abrasives so are capable of removing clear coat more quickly. This allows deeper scratches and swirl marks to be removed.
However, since it’s more aggressive, you can leave behind some “hazing” which needs to be removed afterwards.
Polishing
Polishes use milder abrasives so are used to refine the paintwork to a mirror finish, rather than remove deeper scratches and swirl marks. Often, compounding is followed by polishing to remove the hazing left behind.

Risks of Paint Correction
Since you are removing a layer of paint, there are several risks involved in the paint correction techniques. The clear coat on your car, is designed to protect the colour coat underneath from corrosion, fading, and other types of damage.
Every time you correct the paint, you are removing a layer of this protection. So you can only polish and compound so many times before you run out of clear coat.
Take a look at this article I’ve written on the risks of paint correction before trying these techniques.
Here are some other useful articles to read if you’re new to paint correction.
Alternative to Correction
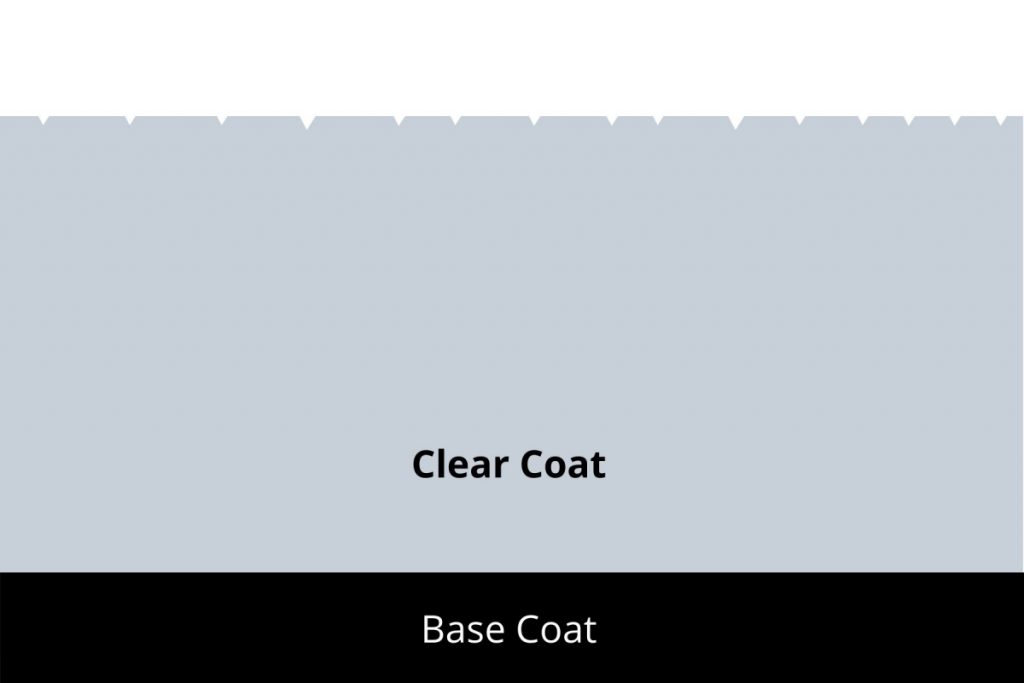
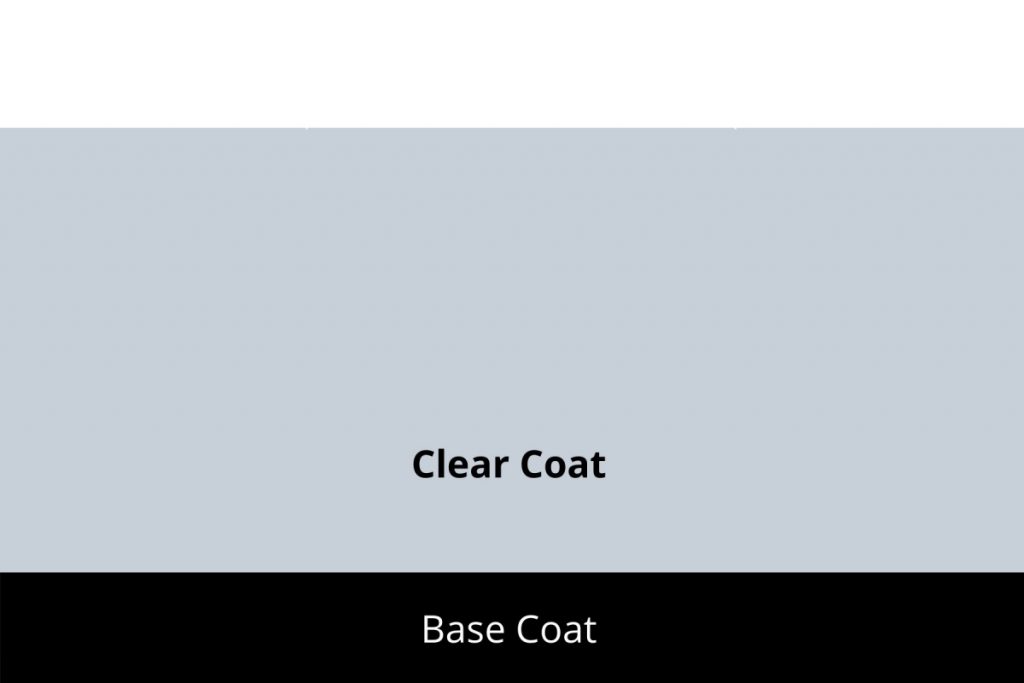
If you’re dealing with a black car that has swirls and scratches, but you don’t want to actually correct the paintwork by compounding and polishing, then there is a solution.
Glazes are products which can be applied to the paint to fill in scratches and swirl marks leaving the illusion of a perfect mirror finish. Check out this diagram to demonstrate.
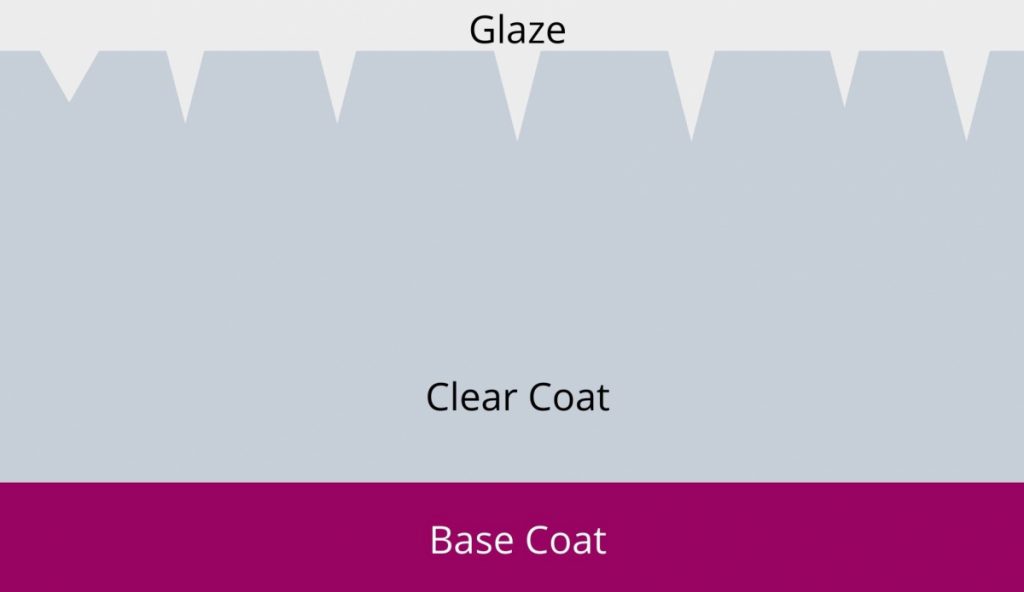
The main advantage of using a glaze, is that it doesn’t remove any clear coat, so you won’t reduce the amount of protection it provides to the colour coat underneath.
However, glazes don’t last forever and you’ll likely only get around 2-3 months durability when you apply a wax over the top. It’s not recommended to apply sealants over glazes because sealants need to bond to bare paintwork. You definitely can’t apply a glaze under a ceramic coating either.
Check out my complete guide to glazes to learn everything you need to know.
Paint Protection
The final step to getting a mirror finish on your black vehicle, is to protect the paintwork. Protecting the paint is vital for the following reasons:
- Adds a hydrophobic effect so water and dirt are repelled making it easier to clean and less likely to cause scratches.
- Protects from UV damage and fading.
- Prevents contaminants bonding to the paintwork.
- Enhances gloss and shine.
- Prevents water spots.
There are three main types of paint protection: wax, sealant and ceramic coating. Here’s a quick rundown of them all.
- Waxes are natural forms of paint protection which offer a warm glow and easy application, however they’re less durable than sealants or coatings. They often come in a paste format.
- Sealants are synthetic, and offer a colder-harder shine. They come in liquid and paste formats. Sealants are more durable than waxes and offer better protection.
- Ceramic coatings offer the best protection and can often last several years on the paint. However, they are harder to apply and much more expensive.
Here’s a quick table to summarise the differences between waxes, sealants and ceramic coatings.
| Wax | Sealant | Ceramic Coating | |
| Durability | 1-3 months | 6-12 months | 2-5 years |
| Application | Very simple and fast | Relatively easy | Requires more skill |
| Cost | Approx $30 | Approx $35 | $100+ |
| Finish | Warm | Cold | Cold |
| Can be applied over glazes? | Yes | Yes, but will reduce durability | No |
| Ease of removal | Very easy | Moderate | Difficult |
Don’t Forget the Details
Making a black car look brand new isn’t just about the paintwork, but it’s about all the details too. Nothing ruins the look of a freshly washed and waxed car quite like streaky windows, browned tires and rusty exhaust tips.
Wheels and Trim
The alloys and tires on your car need to be detailed if you want to finish the look and make the car look a lot cleaner. Here’s how to do it.
- Then tackle the wheel arches and wheel barrels to really give them a good deep clean.
- You should also scrub the tires down using an APC or dedicated tyre remover.
- Use dedicated wheel cleaner and microfiber wash mitt to clean the alloys.
- Rinse and dry the alloys.
- Then you can apply a sealant or coating to the alloys.
- Apply a tire gel to the tires to restore the black finish.
- Use a trim dressing to protect and freshen up any rubber and plastics on your car’s exterior.
Take a look at this guide to restoring faded tires to learn more.
Glass
Glass can be a bit of a pain to keep clean if you don’t have the right tools or use the right techniques. Here’s my quick guide to detailing the glass.
- Use a clay bar with car shampoo and water as a lubricant to decontaminate the glass and get it squeaky clean (take a look at this guide to claying glass).
- Use a glass cleaner and waffle-weave microfiber towel to clean the glass in a cross-hatch pattern.
- Apply a glass sealant to add a hydrophobic effect and keep it looking cleaner.
Exhaust Tips
Rusty-looking exhaust tips are my pet-hate, and they ruin the look of a freshly detailed car. If you want to learn more about detailing exhaust tips head over to my complete guide to restoring exhaust pipes.
Maintenance Detailing
Now that you’ve done a complete detail on your black vehicle, it’s time to think about maintenance. You’ve probably heard the saying, “owning a black car is like having a second job”. But it doesn’t have to be a nightmare.
With regular maintenance, you can keep your black car looking brand new for years to come. Here’s how to maintain a black car.
- Wash the car safely (avoiding scratches and swirl marks) at least every 2 weeks.
- Apply wax, sealant or coating when you start to see the hydrophobic properties diminish to ensure the paint is protected.
- Do not use a quick detailer to remove dust because it will cause scratches. Instead, wash the car properly when you get time.
- Never take your car to an automatic car wash because it will scratch the paintwork.
- Clean the glass weekly to improve visibility.
Check out this article to learn how automatic car washes can ruin the paint by causing swirls and scratches.
Thanks for reading! I hope you’ve found this article helpful. Don’t forget to check out the rest of the website to learn everything you need to about car detailing.
